
DATA EXECUTION POLICY BYPASS USING RETURN ORIENTED PROGRAMMING CHAINS

This blog post was written by Dharmik Karania.
Data Execution Prevention (DEP) was introduced as a security mechanism in Windows Machines to make parts of memory non-executable, due to which attacks that attempt to execute instructions on the stack will lead to exceptions. But ambitious cybersecurity investigators have found ways to bypass it. In order to understand this, we will first start by understanding buffer overflow exploit development.
Anatomy of the memory

We have kernel at the top and text at the bottom. When we think of the kernel, we can think of it as the command line. The stack is used by the processes for the storage of automatic identifiers, register variables and information about function calls. The text segment is a section of a program in the memory and it holds executable instructions. The heap is a segment of memory where dynamic memory allocation takes place.
Structure of the stack

What usually happens is that the buffer space fills us with characters, so the buffer space will go downwards. With proper sanitation, the characters in the buffer space should not flow beyond the buffer space to the EBP. When a buffer overflow attack occurs, the characters are written beyond the buffer space to the EBP and EIP. This is dangerous because if the attacker gains control over the EIP, the attacker can use the pointer to point to malicious code and gain a reverse shell. However, windows have a protection mechanism called Data Execution Prevention (DEP) and this mechanism makes parts of memory non-executable and thus it prevents buffer overflows from occurring. However, in this blog, I use a method of Return Oriented Programming (ROP) chains to bypass this protection mechanism.
Tools I used to bypass DEP using ROP chains:
- Windows 7 virtual machine
- Kali Linux virtual machine
- Vulnserver- which is installed in my Windows Machine
- Immunity Debugger- which is installed on my Windows Machine
- Mona modules- which should be installed in the Immunity debugger folder.
Steps to conduct a buffer overflow attack
Spiking
The first step is to disable your Windows defender real-time protection as shown below. This is because vulnserver will be blocked by Windows defender when we run anything malicious against it.

What spiking does Is that we take each of the commands one at a time and try to overflow the buffer. If it crashes then we can know that that command is vulnerable. To do this, we first run vulnserver as an administrator, and then we run immunity debug also as administrator and we attach the vulnserver to it. We then run the following command on our Kali Linux machine:

We test each of these commands for if they are vulnerable. This process is called spiking. We write a python script as shown.

We send the variable in all different forms and iterations and try to break the program. We run this script as follows:
We should perform the above for all the commands. When we run the TRUN command, I notice that there is Access Violation and immunity stops running and the vulnserver has crashed and so we know that TRUN is vulnerable.
How to FUZZ the TRUN command with a Python Script
Fuzzing is similar to spiking as I will be trying to send a bunch of characters and I will try to break it. I first attach vulnserver with immunity Debugger and I then run the following script to fuzz. Fuzzing allows us to identify if a command is vulnerable and how many bytes it takes approximately for an overflow.

When this command is run, the server crashes and when I kill the command running on my Kali Linux machine, it shows me the exact byte where the program crashed as shown below:


We crashed at around 3000 bytes as we take a round figure. The next step is to find the offset.
Finding the offset
Finding the Extended Instruction Pointer (EIP) in buffer overflows. This allows us to point to a malicious shellcode later on. I then look for where we overwrite the EIP and to do this, I use an inbuilt tool in Kali Linux called Pattern create as shown below:

I then copy the pattern to a python script under offset as shown:

I then attach vulnserver to immunity debugger again and run the script and get the following result:

Vulnserver crashes and it overwrites everything. I am interested in the value of EIP. I then use the value of EIP to get a pattern offset using the following command:
The information retrieved is important because it tells us that at 2003 bytes we can control the EIP. The next step is to overwrite the EIP.
Overwriting the EIP
In this step I use a script to control and overwrite the EIP in buffer overflows and thus allowing me to execute malicious code.

I again attach vulnserver to immunity and then run the code and I get the following result:

If you notice the EIP is 42424242. I only sent 4 bytes of Bs and they all landed on EIP and thus this means we control the EIP now. The next step is to find bad characters.
Finding bad characters
A bad character is simply a list of unwanted characters that can break the shellcodes. We thus have to identify these bad characters and omit them otherwise we will not be able to get a shell.
I run the following script again on vulnserver which has been attached to immunity.


Vulnserver crashes and to run the eye test on the bad characters, I right-click on ESP and click on follow in the dump. This takes me to the left screen where I can see all the bad characters. I run an eye test to check whether any of the bad characters have been overwritten. “\x00” is always a bad character and thus I have omitted it from the script from the beginning.
The next step is to find the right module.
Finding the right module
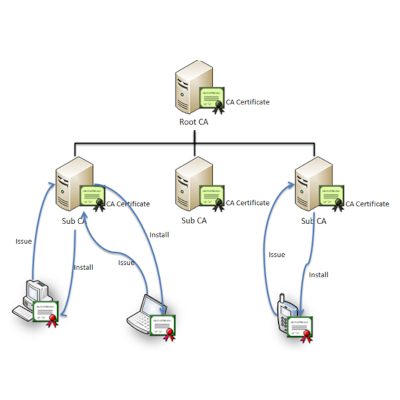
To find the right module, I have installed mona.py (https://github.com/corelan/mona) from this link and I have placed it in the immunity debugger folder under the Pycommands folder. In my immunity debugger, I run the following command highlighted in the diagram.

I notice the first one is the best candidate because there are no protection mechanisms in place as all measures are false and thus, I can easily obtain a reverse shell. Since I know that I will be attacking essfunc.dll, I need to know the opcode equivalent of a jump so I am basically trying to convert assembly language into hex code. so I do that in Kali Linux.

I then use the hex code to find the correct module.
Our JMP ESP opcode equivalent is “FFE4”. Now, I can use Mona again to combine this new information with our previously discovered module to find our pointer address. The pointer address is what we will place into the EIP to point to our malicious shellcode. In our Immunity search bar, I type in: !mona find -s “\\xff\\xe4” -m essfunc.dll and view the results:
The syntax means that we find the essfunc.dll module which has an opcode equivalent of FFE4.

I find 9 pointers. What we have just generated is a list of addresses that we can potentially use as our pointer. The addresses are located on the left side, in white. I am going to select the first address, 625011AF, and add it to my Python code as shown:

So, now I replaced our four B’s with our return address. The return address is entered in a Little Endian Format and thus it is written in reverse. We have to use the Little Endian format in x86 architecture because the low-order byte is stored in the memory at the lowest address and the high-order byte is stored at the highest address. Thus, we enter our return address backward.
Now, I need to test out our return address. Again, with a freshly attached Vulnserver, we need to find our return address in Immunity Debugger. To do this, I click on the far-right arrow on the top panel of Immunity as shown:
Then search for “625011AF” (or the return address you found), without the quotes, in the “Enter expression to follow” prompt. That should bring up the return address, FFE4, JMP ESP location. I then hit F2 and the address should turn blue which shows that we have set the breakpoint.

I then execute my code and see whether it triggers the breakpoint. If it triggers in the immunity debugger, that means I can now develop the exploit.
Generating Shellcode and gaining access
To generate the shell code I create a payload and put the payload in the python script as follows:


-p is for payload. We are using non-staged windows reverse shell payload.
LHOST is the ATTACKER’S IP address.
LPORT is the ATTACKER’S port of choice. Here I am using 4444.
EXITFUNC=thread adds stability to our payload.
-f is for the file type. We are going to generate a C file type here.
-a is for architecture. The machine we are attacking is x86.
–platform is for OS type. We are attacking a Windows machine.
-b is for bad characters. Remember, the only bad character we have is the null byte, x00.
I then set up a Netcat listener to receive the connection.
I then run vulnserver only and execute the following code and I get a shell

I could get this shell because Data Execution Prevention (DEP) was turned off. However Windows machines have DEP protection mechanism enabled and thus if I run the script when this protection mechanism is turned on, then we cannot get a shell.
However, a method has been researched where I can get a shell despite the DEP protection mechanism is turned on. I shall discuss this next. The image below shows DEP protection which is turned ON by default on Windows Machines.


!mone rop -m *.dll -n -cpb “\x00”
This command creates a Return Oriented Programming chain.
-m specifies the module which mona will search through
-n means that we want the chain to be saved to a file.
-cpb means that we need to specify the criteria with bad characters by pointing to it.
In order to get a shell despite the DEP protection mechanism being on, I run the above command in the search bar of immunity debugger. This generates a Return Oriented Programming Chain (ROP) and saves it in a file. The file is saved in the Program Files of Immunity debugger. It is called rop_chain.txt. I then transfer the file to the Kali Linux machine.
I open the file in my Kali Linux machine and copy the python code from the Register setup for VirtualProtect() into another python file. I also create another payload as shown above, and the complete code looks as follows:


I set up my listener and run vulnserver and run the code and get a shell.

Prevention Mechanisms
Enhanced Mitigation Experience Toolkit- By Microsoft. It provides a unified interface to enable and fine-tune Windows security features. It can be used as an extra layer of defense against malware attacks, after the firewall and before antivirus software
Randomizing the location of the code of third-party applications using various narrow-scope code transformations.
Detection Mechanism
ROPscan has been implemented as a detection mechanism for ROP chains. ROPscan can detect ROP payloads in the raw network data that are transmitted through the TCP stream.
References
https://medium.com/cybersecurityservices/dep-bypass-using-rop-chains-garima-chopra-e8b3361e50ce
https://medium.com/4ndr3w/linux-x86-bypass-dep-nx-and-aslr-with-return-oriented-programming-ef4768363c9a
https://tcm-sec.com/buffer-overflows-made-easy/
Disclaimer
The MacroSec blogs are solely for informational and educational purposes. Any actions and or activities related to the material contained within this website are solely your responsibility. The misuse of the information on this website can result in criminal charges brought against the persons in question. The authors and MacroSec will not be held responsible in the event any criminal charges be brought against any individuals misusing the information in this website to break the law.

![The Auror Project – Challenge 1 [Setting the lab up automatically]](https://macrosec.tech/wp-content/uploads/2022/04/Auror-Project-500x383.png)

